ATLAS TILECAL OPTICAL INSTRUMENTATION PROCEDURES AT MSU
R. J. Miller
Version 2.6 March 21, 2001
TABLE OF CONTENTS
0. INTRODUCTION *
1. MODULE
PREPARATION *2.
TILE INSTALLATION *3.
FIBER PREPARATIONS *4.
PROFILE/ WLS FIBER INSTALLATION *5. FIBER
ROUTING *6.
GLUING *7.
POLISHING *8 SECURING THE FIBER
BUNDLES *9.
SCANNING THE MODULE *10.
CLOSE UP *11.
REPAIR PROCEDURES *12.
TRANSPORTER OPERATIONS *Table 1: PMTs, Cells, Aspirin Tubes, Silicone Tubes *
Table 3: Aluminum Tape Locations *
Table 4. Belt Loop Locations *
Fig. 2: Tilecal Extended Barrel Module *
0.1 The big picture
The Tile Calorimeter is one part of a large device called ATLAS that is being built to detect and measure the particles coming from collisions of protons in the 'Large Hadron Collider' (LHC). When completed in 2005, the LHC will generate collisions with energies of 14 TeV, about 14,000 times the energy contained in the mass of a proton. Particle physicists from all over the world are preparing to use this facility at CERN near Geneva, Switzerland to learn more about the fundamental nature of matter and its interactions. You can think of the LHC + ATLAS detector as a powerful microscope that can 'see' objects that are 14,000 times smaller than the proton. Some pictures of the ATLAS detector are shown on the wall in this lab. The detector has a cylindrical symmetry with the colliding proton beams on the axis of the cylinder. Note that the 6-ft. (1.9 m) tall person standing near the base indicates the scale in these drawings.
The Tile Calorimeter, TileCal for short, is shown in the picture as a set of three barrels made up of 64 independent slices that we call modules. The central, blue barrel is about 6 m long. The two green barrels at either end, called the extended barrels are each about 3-m long. One of the extended barrels is being made in the US by a team consisting of people from MSU, Argonne National Lab (ANL), the University of Chicago (UC), the University of Illinois (UI), and the University of Texas in Arlington (UTA). The large black wedges that you will work on this lab are extended barrel (EB) modules. We will be using materials that come from collaborators at many other institutions.
The TileCal is designed to measure the energy of 'hadrons', particles like protons that interact strongly with the nuclei of the atoms that make up the materials in the modules. When a high-energy hadron collides with a nucleus, it usually results in the production of additional hadrons. Part of the kinetic energy of the original hadron is converted into the masses and kinetic energies of the new hadrons. This process is repeated many times as the hadrons proceed through the calorimeter until all of the kinetic energy is used up. About 2/3 of the hadrons that are produced in this cascade are electrically charged and these interact with the electrons in the atoms causing those atoms to be in temporary 'excited' states. We can use this effect by putting in some transparent material whose excited atoms emit light that we can detect. Although this scintillating material represents only a minor fraction of the total material in the calorimeter, we can distribute it in such a way that the total amount of light that we detect is proportional to the energy of the initial hadron.
0.2 Our job
Our job at MSU is to take the bare steel modules that we receive from ANL and add the scintillating plastic tiles and wavelength shifting (WLS) optical fibers that turn this module into a useful detector. We will instrument a total of 32 modules at a rate of approximately 1 module every 4 weeks. We must do this using a careful set of procedures so that the modules that we make all perform in a similar, predictable way. The accuracy of the energy measurements that we make with the TileCal depend on the uniformity with which the light is generated and collected, so we will try to make these modules as uniform as we can. The quality control (QC) procedures that we all must follow in this instrumentation process are the essential means that we use to achieve this goal.
0.3 The check sheets
The primary QC tool is the set of check sheets that are filled out as each module is being instrumented. They list the tasks that must be done, the tests and measurements that must be performed, and the materials that are used in the module. These check sheets are the primary record of the instrumentation history and quality of the module. They will become part of the data available to the rest of the collaboration on our www pages.
These sheets are kept on a clipboard that should be hung on or near the module. Each person working on the module must fill out these sheets on a daily basis . Usually the entry consists of the initials of each person that has worked on a task and the date that the task is completed. Some of the tasks also require that material ID numbers or other data be recorded on the materials list or other page. You should also record additional information as notes at the bottom or back of the pages. Note any problems encountered during the tasks, solutions or fixes that were made, departures from standard procedures, and any questions or suggestions. Label the notes with the appropriate task number.
0.4 This document
The remainder of this document describes the tasks that are listed on the check sheets, using corresponding numbers. You are not expected to memorize any of this. However, you should read the task description before you do that task for the first time. Refer to this document whenever you need to remind yourself what a task is about. You will have to use the drawings and tables in this document to do some of the tasks. You will eventually be expected to know how to do most of these tasks and you should use the check sheets and this document to know what to do when you come to work without having to be assigned to a task.
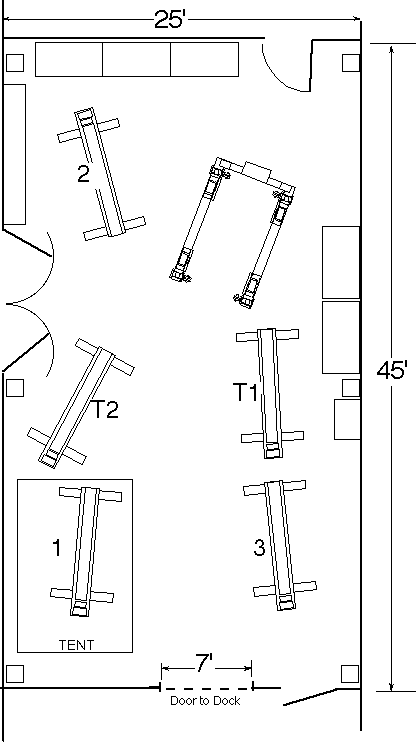
Figure 1 shows a drawing of a Tilecal EB module. The drawing identifies the module features and parts that will be referred to in this document and in the check sheets.
1.1 Set up the module
The module will brought into the building on the transporter and initially set on the floor in one of the three locations that have been marked as shown in Figure 1. The ITC ends of the modules should always be toward a corner of the lab.
Keep in mind the space needed to work on the module. Don't use this space to store any fixtures or materials that can't be easily moved by one person. There must be enough free space at the ends of the modules to attach the 4-ft long polishing fixtures. We also need clearance on the sides of the module to set up the work stages that will be described below in task 4.1. We must be able to move the light tent over the module and move other modules into or out of the lab on the transporter.
The sequence of moves that are required to exchange a finished module with a new one depend on the module location as follows.
The tasks up to and including tile installation can be completed with the module sitting on the floor. Before the fibers can be installed, the module must be raised and set onto the jack stands with the jack post set one notch above the lowest position. This will ensure that the fiber ends are clear of the floor. Make sure that all 4 jack stands are set to the same height.
1.2 Initial Inspection
Before starting the preparation, the module should be inspected for any obvious defects or substandard construction. Most of these problems can be fixed but make notes so that we can inform the people at the submodule or module assembly sites and avoid them in the future. Examples of problems to look for include:
1.3 Clean excess paint out of the slots.
One of the major problems on the first few modules that we instrumented was caused by paint in the slots on the sides of the module. This made the proper installation of the profiles very difficult. To avoid this, we have made a special scraping tool consisting of saw blades mounted in a handle. This tool should be pulled through all of the slots on the sides of the module to remove any excess paint in these slots and insure that the slots have sufficient depth and width. To keep track of which slots have been cleaned, put a strip of masking tape along the length of the module at the top end of the slots. The saw will puncture the tape as each slot is cleaned. After all of the slots have been scraped, clean any paint flakes from the module using the large vacuum and clean up the paint scrapings from the floor under the module using the small shop-vac.
1.4 Remove the tie rods and clean out the source tube holes
The module should come with a set of 10 rods inserted in holes through the length of the module. Remove these, put the nuts back on the ends of the rods so that they aren't lost and store them on the shelf. Use one of the rods to check the source holes that don't have rods, to make sure that there are no blockages due to paint or epoxy or displaced alignment spring pins. Note any problems on the check sheet and make sure that Mike Nila knows of it.
1.5 Cover the holes in the bottom of the girder
The large boltholes in the bottom surface of the girder must be covered to keep out dirt and to avoid damage to the fibers during installation. Cover these holes with a 1-3/4 inch square of the black polyethylene held in place with a 2-1/2 inch squares of the Aluminum tape.
1.6 Drill and tap the holes for the belt and laser fiber mounts
Drill and tap four holes about 10-mm deep, one at each end of the girder on each side, about 25-mm above a line through the centers of the girder rings. Use the #25 drill and the #10-24 tap. These will be used to mount the belt that constrains the fibers inside of the girder envelope.
Drill and tap 2 holes, #10-24, about 10-mm deep, located on the vertical surface of the girder about 300 mm from the ITC end and about 30-mm below the top. These will be used to mount the laser fiber couplers. Vacuum up all metal chips made in this operation.
1.7 Clean the module surfaces
Wipe or vacuum dust off of the module surfaces, including the top surface, the inside and the outside of the girder.
1.8 Mark the cell boundaries
The cell boundaries and labels are painted on the sides of the module using the large plastic stencil. It will require two persons to do this job. Hang the stencil on one side of the module using the two Aluminum plates that fit into the top row of tile slots. The stencil should fit with the edges aligned with the edges of the module. One person should hold the stencil flat against the module while the other sprays the paint along the cell boundary lines and over the cell lettering. Take care to use the set lettering set that is in the right orientation for the side that you are painting. Wait about 1/2 hour for the paint to dry and then use the stencil to paint the other side. The boundaries should be in the same locations on both sides.
1.9 Install the cell labels and cover with tape
A set of printed labels identifies the boundaries between the cells and the number of fibers that will be installed in each cell. These are applied to the flat areas just below the bottom of the profile slots. Use the magnetic rulers with the tile numbers to place the labels in the proper locations. Cover the labels with the package sealing tape to make sure that they don't come off. The sealing tape can be a continuous length over the cell labels. Be careful not to cut your finger on the metal shims that sometimes protrude from the gap between the submodules and the girder. If you see one of these, try to file off the projecting part.
1.10 Ream the girder rings
The girder rings that have been labeled with a PMT number have to be reamed to allow the aspirin tubes to be inserted and removed with out excessive force. Use the special reamer that has been made for this purpose. After you have reamed the holes, vacuum the girder rings and the inside of the girder to remove any shavings made by the reamer.
2.1 Measure the gaps for shims
Use the gauge tool to measure the gaps between submodules. Record the numbers on the 'Shim Data Sheet' that is included with the check sheets. The measurements should be made at points near the bottom of the tile layer 1 slots and at the top of the tile layer 11 slots on both sides of the module. Use the smallest of the measurement on the two sides to determine the size of shim needed to make the slot 3.9-4.2 mm wide.
2.2 Install the shims
The tile shaped white plastic shims should be inserted into the wide slots between submodules. Shims of 0.5, 0.75 and 1.0 mm thickness can be combined to make the final thickness determined in 2.1. The shims should be inserted on the side of the slot that has the crack in case shims have to be added in other places in the slot. If this crack is too wide, the shim will fall into the crack. In that case you should use the 2-sided adhesive tape to hold the shim onto the tile. Center the shim on the tiles so that the edge of the shim is flush with the edge of the master plate.
If the gap is too wide at the other tile layers to keep the profiles in the slot, the strips of shim with the 2-sided adhesive tape can be cut to the lengths needed and attached to the tiles in those layers. Sort and record the tile batch numbers
2.3 Sort & record the tile pack numbers
You will need 140 tiles (7 packs of 20 tiles/pack) for tile layers 1-6. Tile layers 7 and 9 require an additional 5 regular tiles and layer 8 an additional 4 regular tiles. Layers 10 and 11 require an additional 17 tiles. In addition, layers 7:10 have a special tile in the first position at the ITC end.
Find the box containing tiles of the size to be sorted. If there are not enough tiles in that box, open another one. Make a list of all of the pack numbers in the open box(es). Using the list in this instruction binder, sort the tile packs according to the rank. Low rank number corresponds to the best tiles (just like football rankings). Select the 7 (or 8) best packs. Record this list of pack numbers, in rank order on the materials data sheet. Put the other packs back into the box and put the box back on the shelf. Those remaining packs will be included in the sorting for the next module.
2.4 Mask the size 7 tiles
The scintillating tiles have been made using polystyrene from two different sources (due to the fact that the first source in Russia went out of business). Tiles in these different production batches have different light yield and a noticeably different color. We will not mix the two types of scintillator within a cell, except in the case of the B cells for approximately the next 8 modules. In the B cells, we will have to mix the new, blue colored tiles in layer 7 with the older, yellow colored tiles in layers 4-6. To compensate for the higher light yields, we will be coating about 25% of the area on the edges of these size 7 tiles with a special white paint.
The size 7 tiles selected for the B cells should be unwrapped and stacked in ranked order on the turntable that has been made for the masking operation. Do not include the first 5 tiles that will be used in the C10 cell. There should be 140 tiles in the stack. Label the stack to indicate which end corresponds to the best tiles that will be at the ITC end of the module. This is necessary because the order will be reversed when the stack is rotated 180 degrees. Insert the rods that have been made for this operation through the holes in the tile stack, put the washers over the ends of the rods to protect the surface of the tiles, and use the clamps to hold the tiles in alignment. Cover the exposed edges of the tiles with the adhesive paper that has been cut to a width that leaves 22.5 mm at the top and bottom of the edge uncovered. Spray the exposed area with the Bicron 620 paint in a thin layer. Turn the stack and do the other side. Wait 5 minutes for the paint to dry. Repeat until the paint has made an even, opaque film. It will take about 5 coats of the paint.
2.5 Insert the Tiles
Wear cotton gloves during this operation. Skin oils transferred from your fingers to the plastic tiles will cause the surface to craze and will spoil the light output.
Insert the tiles in ranked order with the best tiles at the ITC end of the module. In the case of the size 7 tiles the masked tiles start in the B-11 cell. Put the unmasked size 7 tiles in the C10 cell.
Hold the tiles so that you pinch the Tyvek sleeve against the tile as you insert it so that the sleeve doesn't come loose from the tile. The tiles should be inserted so that they are centered in the module. This will put the ends of the tiles slightly (1/2 mm) above the surface of the spacer plates and about 2-1/2 mm below the surface of the master plate. Use the plastic guide block to set the depth if necessary. For the last inch or so you will have to push the tile from the end. Do this as carefully as you can.
If a sleeve comes loose there are a couple of techniques you can try to center the sleeve so that it does not extend beyond the end of the tile. After the sleeve has been inserted as far as you can by pinching it against the tile, pull the tile out a bit and wiggle it up and down as you insert the tile to work the sleeve in the rest of the way. If this doesn't work, you may have to pull the sleeve into the slot with tweezers before inserting the tile the final inch. Another technique that has been used is to make a wedge from a piece of profile material and insert it between the bottom edge of the tile and the sleeve to lock them together as they are pushed into the slot.
2.6 Insert the special ITC tiles
The first tile at the ITC end of layers 7:10 has an extra large diameter hole to allow room for the fitting that will go onto the source tube in these locations. These tiles are in a separate box that is labeled 'special tiles'. The ones for layers 7 and 9 are on the outside surface of the ITC submodule and must be held in place with the tie rods, inserted as task 2.8.
2.7 Tile inspection
Before proceeding, the tiles should be inspected and any problems corrected. Check for the following.
2.8 Install the rods
Reinsert the rods that were removed in 1.4. These go into the top hole of each layer except layer 7 that has no rod. Instead, insert one of the 8-mm diameter plastic straw tubes into the top hole of layer 7.
The rods are not symmetric end for end. The end with the longer thread goes at the ITC end of the module. Put a nut all the way onto the end with the short thread, push that end all the way into the counter bored hole, then put the nut on the ITC end of the rod and tighten with the socket wrenches. This will require two persons, using a wrench at each end. The nuts should be below the end of the rod and the end of the rod should be below the surface of the end plate in those locations where the end plate has been counter-bored. Put one of the Teflon washers under the nut at the ITC end of the rod in layer 9 . This nut should only be finger tight to avoid damaging the external tile.
3.1 Install the PMT labels
A set of adhesive labels is printed with the PMT numbers and corresponding cells. These are applied to the module above the girder rings following the pattern shown in Table 1.
3.2 Label the bottom of the aspirin tubes
Select a set of aspirin tubes with the diameters listed in the Table 1. Label the bottom of the aspirin tubes with the PMT number using one of the sharpie markers. Put the label close to the circumference so that it will not obscure the view of the fiber ends through the bottom of the tube.
3.3 Install the aspirin tubes and washers
Insert the aspirin tubes into the girder rings with the corresponding PMT labels. Put one of the plastic washers under the flange of each tube. Use the small cordless screwdriver to insert three self-tapping screws into the holes in the girder ring. Set the clutch at setting #1 to insure that the screws are not over-tightened. Install one of the Aluminum covers over each of the girder rings that do not have PMT labels. Attach the covers using only one screw at the top, leaving it loose enough to swing up. We will insert the other two screws after we clean out these girder rings following the polishing operation.
3.4 Install the brass fixation rails
There are four 8 mm diameter tapped holes spaced about 80 cm apart about 1 inch above the lower flange on each side of the girder. Screw one of the 35 mm long threaded brass rods into each hole. Put a short length of shrink tubing over the threaded rod to cover the threads. Assemble the rail using pieces of the 8 mm diameter brass tubing inserted into the copper pipe Tees. The length of the tubing should be about 1 inch less than the spacing of the threaded rods. Glue the tubing into the Tees and glue the Tees onto the threaded rod using the 3M 2216 structural epoxy. The rods should be supported with the aluminum spacer block while the epoxy cures for about 24 hours.
3.5 Install the belt loops
The belt loops are plastic angle brackets with a slot cut through one leg. Four of these are attacked to the surface on each side of the girder in the locations given in Table 4. Clean the surface of the girder with alcohol, then peal the backing off of the adhesive pad on the belt loop and stick it to the surface with the slot in the vertical plane.
3.6 Cover the PMT labels with tape
Cover the PMT labels with the clear package sealing tape to keep them from coming off.
3.7 Install the laser fiber bundles
Attach one of the cable tie mounting tabs using a flat head #10-24 screw into the hole that was prepared in 1.10. Attach the laser connector to this mounting tab with a cable tie. The connector should be oriented so that the output fibers go toward the ITC end of the girder, then turn 180 degrees before going back to each of the PMTs, as shown in Fig. 2. Tie the bundle of fibers loosely to the rail with Velcro ties. The input fiber goes back to the non-ITC end where the extra length should be tied into a loose coil.
3.8 Record the laser fiber numbers
Enter the serial numbers of the laser fiber assemblies into the materials list.
3.9 Cover the girder area
Cover the open sides of the girder with a piece of the black polyethylene plastic using some masking tape to attach it. This will prevent the fiber ends from catching on the lower edge of the girder during installation.
3.10 Install the ITC fiber support panels
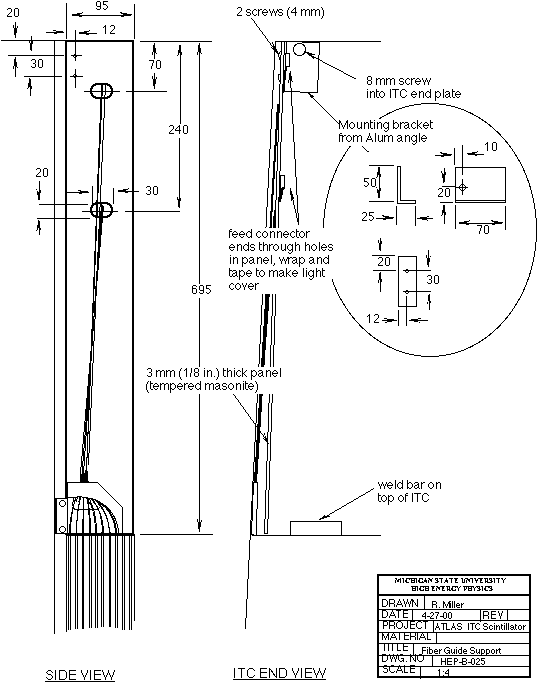
Attach two of the support panels to the ITC end of the EB module as shown in Figure 3. The panels can be used on either right or left sides but the mounting brackets come in left and right parities. The brackets are attached to ITC end plate with the 8-mm button head screws. The panel is attached to the bracket with two of the #10 x 1/2-inch screws. The bottom of the panel is not attached but will be captured between the fiber assembly plate and the weld bar on the ITC plug.
4. PROFILE/ WLS FIBER INSTALLATION
4.1 Setup the profile shelves
To install the profiles, the module must be up on the jack stands so that the fibers will clear the floor. The wooden stages are placed on the beams and the toggle clamps are closed to hold them in place. This is a job that requires two persons. The sockets for the railing should be on the outside and there should be a gap of 2-3 inches between the stages and the module. Next, the railings are dropped into the sockets. Finally, attach the shelves to the railings so that the shelf is at the level of the top rail and the braces hook over the middle rail.
4.2 Select a box of profiles and record the batch numbers
The boxes of profiles are labeled according to the cells in the A and B layers that they are in. They also are identified as 'Long' or 'Short'. The long and short profiles go in alternate slots, the long ones start at the top of layer 1, the short ones start at the top of layer 2. If the cell boundaries are vertical and accurately placed, you can use these to select the profile. However, as you reach the transition between cells, check the boundary using the printed adhesive labels that were placed along the bottom of the slots. The number of profiles of each type and the WLS fiber lengths in those profiles is listed in Table 2.
The batches of profiles are identified by the date that we received them. Record the date on the materials id sheet for each box of profiles as you use it.
4.3 Insert the profile and fibers
The profiles are inserted into the slots between the steel plates using a special tool that has been designed for this job. The tool compresses the profile and also pushes it into the slot as it is pulled down the length of the profile. Insert the top end of the profile into the tool so that the fibers are facing away from the handle. The open slot is at the top of the tool and the profile hangs out of the hole in the bottom of the tool. Pull enough of the profile out of the top of the tool so that you can align it with the top of the slot. The top ends of the profiles should be at the top of the slot but must not be on top of the weld bead that will prevent it from being pressed all of the way into the slot. The top ends should be aligned with each other within about 2 mm.
Hold the end of the profile in place while you press the tool against the module and draw it down over the rest of the profile. Try to go at a slow steady speed, taking care that the tool stays in the slot, the profile is all the way into the slot and is not twisted. As you reach the bottom of the slot you have to relax the pressure so that the fibers aren't bent over the bottom edge of the slot. Slide the tool off of the tail of the fibers and let them drop back into the space between the stage and the module. Press the bottom end of the profile into the slot by had. Be careful not to kick the fibers.
4.4 Install the ITC fibers
The profiles for ITC cell D4 can be installed using the same method as for the other profiles. However, the profiles that are part of the ITC fiber assembly that uses 8 of the slots in the C10 cell have to be installed using the following procedure.
Open the polyethylene storage bag at the connector end and remove the twist tie that holds the bag to the aluminum plate. Slide the bag off of the assembly while holding onto the optical cables. Apply a temporary piece of tape to the WLS fibers just below the bottom edge of the profiles to keep the profiles from sliding off while the assembly is being mounted. Leave the cardboard splint attached to the plate temporarily to provide strain relief for the fibers where they exit the plate.
Carry the assembly into position, holding the metal plate in one hand and supporting the fibers with the other. Attach the plate to the ITC end plate using one of the button head screws in the hole as shown in Figure 3. Insert the screw far enough to hold the plate, but do not tighten yet. The profiles should hang in line with the slots that they will occupy. Insert the connector ends through the holes in the support panel.
Remove the cardboard splint by pulling off the tape that holds it to the plate and slitting the tape that bridges the two cardboard pieces. Insert the second button head screw into the second mounting hole in the plate. Do not tighten it yet. Press the ends of the profiles near the plate into their slots.
Complete the insertion of the profiles by hand or use the special insertion tool that has been made for this. (The insertion tool used for the other profiles can't be used.) The plate should now be in its final position and the screws can be tightened. Install the second assembly on the other side of the module. The 8 longer clear fibers on the odd (even) side are routed to PMT13 (PMT14). The 8 shorter clear fibers on the odd (even) side are routed to PMT1 (PMT2).
4.5 Record the ITC fiber serial numbers
Select a pair of ITC fiber assemblies to be installed and record their serial numbers in the Materials List. The assemblies come as a 'right' and 'left' pair. These labels refer to the mounting position on the ITC end plate, looking from the ITC end with the girder down (normal installation orientation). The labels end up on the inside surfaces of the plates (facing each other).
4.6 Inspect the profiles
Ideally, the profiles fit into the slots so that they are flush with or slightly below the surface of the steel. In that case, the white paint on the front and sides of the profile will not show. A good way to check whether the profiles are inserted properly is to look at the module from the side at a shallow angle. Look for streaks of white from the sides of the profiles. Another good method is to feel the surface. You will be able to feel profiles that are abnormally high or twisted in the slot. After all of the profiles have been inserted and inspected, the profile shelves, railings and stages can be removed
4.7 Install the fiber separator strings
Attach the brackets with the set of three colored strings to the ends of the module using C clamps.
4.8 Separate the fibers by depth
The 3 fibers that are attached to each profile must be sorted according to the cell depth. The A fibers should be on the left side of the profiles and are laid over the inside string. The B fibers coming from the right side of the profiles are laid over the middle string, and the D fibers coming from the center of the profile are laid over the outside string. The fibers from different depths have different lengths and this can be used to check the sorting.
4.9 Make the fiber sub-bundles
The fibers will be routed to a PMT that is approximately in the center of that cell. Some of the fibers will approach the PMT from the right and some from the left. These groups are called sub-bundles. The number of fibers in the sub-bundles is listed in Table 1. Starting a one end of a row of fibers, count out the fibers for that sub-bundle. Slide one of the pieces of white silicone tubing over the sub-bundle up to the level of the string. The silicone tubing comes in several diameters. Use the diameter that is the closest fit for the sub-bundle as listed in Table 1. Wrap a cable tie around the tubing and tighten it just enough to keep the tubing from falling off of the fiber bundle. The tubing should be loose enough so that it can still be made to slide on the fibers. Continue until all of the fibers are collected into sub-bundles.
4.10 Install the LED light tubes
The LED light tubes are used to check the fiber routing, spot damaged fibers and check the light coupling to the scintillating tiles. Insert the support fixtures with the magnetic bases in the source tube holes in the layers to be examined, usually a pair of sequential layers to illuminate all of the fibers in one readout depth, A, B, or D. One of the support fixtures is designed for the odd numbered layers and the other for the even numbered layers. Insert the LED tubes into the holes until the connector end makes contact with the collar in the support fixture. The LED's should be facing up. Attach the power cables to the connector and relieve the strain on the connectors by tying the cables to the support handle using Velcro wraps. The switch box selects the cell and layer to be illuminated.
4.11 Verify the fiber sorting
The fiber sorting is checked using the LED source tubes. See 3.1. Move the tent over the module, close all of the sides and turn out the lights in the tent. Close the black curtain on the lab window. With the LED tubes in the top two tile layers in the cell, illuminate the tiles and fibers in one cell at a time. Make the following checks.
Note any problems on the QC checklist. Identify the PMT, cell, tile layer, and tile number and the nature of the problem. Damaged fibers should be replaced. Stick a label on the profile indicating which fiber is to be replaced.
4.12 Remove the fiber separator strings
The separator strings can now be removed, folded so they don't get tangled and put back onto the storage shelf
.
5.1 Setup the routing models
The fiber routing models are to be used as a guide for routing the fibers to the PMTs in a way that is the same from module to module and as similar as possible at the different instrumentation sites. There is one model for each side of the module. Insert a pair of 10-mm diameter bolts into the tapped holes on the top of the module. Choose the holes that will match the spacing of the eyebolts on the models. Attach the cords to the bolts so that the hooks are hanging on either side. Hang the models from the hooks so that they are above the girders and the horizontal locations of the PMTs match the ones in the module. This is a two-person job.
5.2 Route the sub-bundles to the aspirin tubes
Starting at the ITC end of the module, select the fiber sub-bundles for the B11 cell and bend them in a gentle arc and insert the ends into the appropriate aspirin tube. Continue with the other B cells, then do the A cells and finally the D cells. Make a second pass and rearrange any bundles that do not overlap and interleave the other bundles in the same way as they do on the model. Add a few of the Velcro wraps as needed to keep the bundles in the aspirin tubes but leave them as loose as you can at this stage.
5.3 Route the laser fibers
Start again at the ITC end and select the laser fiber that goes to the first PMT. Insert that laser fiber into the silicone tube on one of the WLS fiber sub-bundles. Route it similarly to the model, taking care not to make the bend radius any tighter than necessary. Insert the end of that laser fiber into the aspirin tube. Route the rest of the laser fibers in a similar way.
5.4 Verify the fiber routing
Before proceeding the fiber routing should be OK'd by the QC officer. This check should include the following:
5.5 Insert the gluing tubes
Use one gluing tube for each PMT. Attach one of the Luer-loc fittings on one end if this hasn't already been done. The other end should be cut with scissors at a 45-degree angle. Insert the gluing tube into the aspirin tube between the sub-bundles.
5.6 Insert the Teflon rods
Insert a length of the Teflon fiber into each of the sub-bundles and inside of the silicone tube. Slide the silicone tube closer to the aspirin tube if needed.
5.7 Register and clamp the fiber ends
This is one of the more difficult and important tasks that you will do. The ends of the WLS fiber must be within about 2 mm of the bottom of the aspirin tubes when they are glued. Otherwise the end will still be inside the glue layer when the end of the aspirin tube is cut off and polished. The fibers in a sub-bundle must be registered so that all of the ends are at the same position.
Hold the sub-bundle of fibers in one hand and pull it out of the aspirin tube. With the other hand tap a flat object such as small mirror against the fiber ends to register them. Ends that are too far up in the bundle will have to be pulled into place. Keep the last four inches or so of the bundle as straight as you can and pointed in the same direction as it has in the aspirin tube so that the fiber ends don't squirm when the bundle is reinserted. When all of the WLS fibers and the Teflon fiber are registered clamp the bundle with the cable tie on the silicone tube. Use the cable tie tool to get it to the correct tension. Insert the sub-bundle into the large diameter aspirin tube that is provided and make a mark around the circumference of the bundle flush with the surface of that aspirin tube. Use the water-soluble marker that has been reserved for that purpose. Reinsert the sub-bundle into its aspirin tube in the girder. The mark will allow us to know when it is all the way in.
5.8 Insert the filler fibers
The filler fibers are lengths of extra 1-mm diameter plastic fibers that are used to fill up any remaining space in the aspirin tubes and lock the WLS fibers in place. Push them into the cracks that remain between the sub-bundles or around the circumference.
5.9 Check for fiber damage
Before gluing, one final check is made using the LED light tubes to look for any fiber damage or other problems that may have developed during the routing and registration. In addition to looking for misrouted fibers, look for broken fibers or missing fibers, stress crazing on the fiber surfaces, scratches or other cladding damage, extreme fiber curvature, and fibers that are in contact with any surface that may cause them damage in the future. List the results on the QC check sheet with the same information as in 4.9, replace any damaged fibers and fix any other problems.
6.1 Prepare the glue cartridges
We use BC 600, a transparent two-part epoxy with a low viscosity. This comes in 250-ml kits consisting of approximately 4 parts resin per 1 part hardener. The resin and hardener are loaded into 4:1 dual compartment 50-ml cartridges. Fill 6 of the cartridges at a time from the kit. Use the stand that has been made to hold the cartridges upright during this operation. Seal the bottom of the cartridges with the cap that has been made for this purpose. Leave about 3/4 inch of space at the top of the cylinders for the pistons. It is helpful to make a line on the cylinders at that location using a sharpie marker.
The hardener component in the smaller diameter cylinder is especially hard to see. A useful technique for filling the cartridge with this component is to fill until it is slightly above the line that you have marked. Then use one of the small syringes with a plastic tip cut to a length that just reaches the line to suck out the excess.
Since the cartridges may stay on the shelf for a month or more, it is essential that there is no contamination between resin and hardener during this procedure. While you are filling one component, cover the other cylinder with Kapton tape to protect against any drips. Insert the piston, using a length of the fine wire to vent the air, until you see the component wet the underside of the piston. Put the filled cartridges in a zip-lock bag and label the bag with the resin and hardener numbers and the expiration date that are found on the original containers.
6.2 Prepare the TV monitor
It is helpful to watch the bottom of the aspirin tubes as the glue is injected to see that the fibers are close to the bottom and the glue fills the tube without air bubbles. This is done using the TV monitor that rides on a carriage inside of the girder. For this operation it is not necessary to attach the extensions to the girder. The camera carriage can be pulled through the girder using a cord. Make a loop under the girder with the cord and attach both ends to the carriage so that it can be pulled in either direction. Attach the power and signal cables. The camera and cables will have to be reversed when the second side is glued.
6.3 Inject the glue
This operation requires at least 2 persons, one to inject the glue and one to close off the fill tubes, catch the drips, watch the TV monitor, and keep the air and power lines to the pneumatic dispenser clear. The glue is transferred from the 4:1 cartridge into a 50-ml syringe through a mixing nozzle. Set up the cartridges, syringes, mixing nozzles, pneumatic dispenser, tissues, masking tape, grease pen, etc. before starting this operation. It will take about 1-1/2 cartridge to fill the aspirin tubes on one side of a module. Remember to put on one of the orange caps on the syringe before filling it. Then attach the pneumatic dispenser to the syringe and hold it with the tip up while removing the cap.
Mark the level of the piston in the syringe with the grease pen. It should move about 1/2-1 cm per aspirin tube. Attach the syringe to the fill tube in one of the aspirin tubes and inject the epoxy until it starts to come our of the vent slot at the edge of the collar or appears around the fibers. Remove the syringe and fold over the fill tube. The second person puts a piece of masking tape on the fill tube to hold the fold. Check the mark that was made on the fiber bundle to make sure that the fibers are completely inserted into the aspirin tube. After all of the aspirin tubes have been filled, go back and check all of the aspirin tubes again to make sure none have slid out.
6.4 Reserve samples of epoxy and record the epoxy batch numbers
Save a sample of the epoxy in one of the small plastic cups so that we can check that it cures properly. Record the serial number of the resin and hardener batches on the materials sheet
6.5 Epoxy cure
The epoxy should cure for 72 hours before polishing. Check the sample that was reserved. If it has cured properly, label it with the module number and put it on the shelf with the other samples.
6.6 Remove the cable ties from the silicone clamping tubes
The cable ties should be removed from the silicone clamp tubes as soon as the epoxy has cured to relieve any stress on the fibers. This must be done with care to avoid snagging the fibers with the cutters or with your hands.
7.1 Setup the polishing machine
Attach the bracket plates to the ends of the girder. The two plates are similar but have different size mounting holes and bolts that match the tapped holes at each end of the girder. Drop the polishing machine girder extensions into these brackets. The extension with the motor should be at the blue end of the module. Use the alignment fixture to align the girder extensions so that the girder rings in the extension are in line with the girder rings inside of the girder, in both horizontal and vertical dimensions. Remember to attach the extra ring that spans the crack between the girder and the extension and make sure that it clears the girder before starting the alignment.
Run the cable over the pulleys in each extension and through the girder to make a loop. Install the polishing machine, tighten the cable to about 100 pounds of tension and attach it to the polisher. Attach the power cable, the control cable and the air hose. These should be fed over the axle of the pulley to keep them from snagging. At the end opposite to the polisher, attach the vacuum covers over the extension. Attach the hose from the large vacuum cleaner and plug in the vacuum power cord.
7.2 Prepare the polisher test sample
Insert the length of round plastic rod into one of the dummy girder rings in the polishing extension. The rod should project inside the dummy girder ring so that the end is cut and polished in a way similar to the aspirin tubes. After polishing, cut off about 1/4 inch from the end of the polished end, label it with the module number and save it in a plastic bag. After we have collected 2 or 3 of these samples, we will send them to Barcellona to check the quality of the polished surface.
7.3 Polish the fibers
Turn on the vacuum, the air and power to the polisher. Turn on the linear drive, check that it is moving freely and that the blade is not in contact with the girder rings. When it has been driven close to the first aspirin tube, put it on the slowest setting and turn on the blade. As it moves through the girder, check that the air and power lines are free. Listen for any changes in the sound that may indicate a problem. Turn it off when it emerges from the far end. Collect the aspirin tube cutoffs, check them to see that all fiber bundles have been cut. Save the cutoffs in a zip-lock bag labeled with the module number.
Remove the polishing machine, slide the pulleys to the other side, reinstall the polishing machine in the opposite direction and polish the other side. Check those cutoffs and store them.
7.4 Remove the polishing machine
Remove the polishing machine and store it back in its box, but leave the cable in the girder. Remove and store the power, and control lines. Leave the extensions mounted on the girder with the vacuum cleaner attached. These will be used for the cleanout and TV camera inspection.
7.5 Install the TV camera and cleaner
Install the TV monitor carriage into the polishing extensions. Reattach the cable, but do not tighten the tension and loosen the pulleys so that the carriage can be pulled through the girder by hand. Attach the camera power and signal cables.
7.6 Clean out the girder
Turn on the vacuum and reattach the compressed air line to the carriage. Pull the carriage through the girder so that the air and brushes clean any remaining chips off of the surfaces and the vacuum cleaner removes them. This can be done at the same time as the fiber ends are inspected with the TV camera. After pulling the carriage through in both directions, sweep any remaining cutoff disks out of the girder. Check them and do an inventory to make sure that all have been accounted for.
7.7 Inspect the fiber ends with the TV monitor
Turn on the TV camera when it is inside the girder so that the automatic gain is set properly. The on-board lights are useful during this inspection and the light tent may be needed to reduce the light coming from inside the WLS fibers. The following checks should be made.
The ends of the WLS fibers should be in focus and should show up as a well-defined green circle. The laser fiber will be an in-focus black circle. The glue fill tube will be a larger diameter, more irregular area. The filler fibers will be gray or white circles and the Teflon will be larger diameter white circles. Fibers that are under the glue and didn't get polished will appear as fuzzy or star shaped images. Check the ITC scintillator fibers by attaching the light source to the input connectors on each of these cables. Record any problems, missing bundles or fibers, scratches or other surface defects.
8.1 Cut the dummy fibers
After the fibers have been polished and inspected the filler fibers should be checked and any that are excessively long should be trimmed to make them fit inside of the girder envelope. The plane that is an extension of the side surface of the module defines the envelope.
8.2 Cut the gluing tubes
The gluing tubes are cut to be inside of the girder envelope using the small wire cutters.
8.3 Tie the fiber bundles to the rail
The fiber bundles should also be inside of the girder envelope. Most of the bundles can be tied to the rail using the Velcro ties. Slide the silicone tubing down over the fibers and use that as a cushion under the tie. Some fibers, such as those from cell A12 are too short to be tied to the rail. These can be tied with a loop of Velcro to the belt described below.
8.4 Install the Nylon belt
There will still be a number of fibers that fall outside of the envelope. These will be restrained by the attaching a Nylon belt. Attach one end of the belt consisting of a loop and buckle to the ITC end of the girder using a#10-24 x 1/4 inch pan head screw through the grommet. Attach the other part of the belt at the other end of the girder and feed the belt end through the set of 4 belt loops that have been glued to the girder. Feed the end through the buckle as shown in Fig. 4. Insure that the fibers will fold into the envelope without being kinked, then tighten the belt. You can add Velcro ties to restrain any fibers that remain outside.
9.1 Make the module light tight
The module should be covered with the black polyethylene as described in 10.1. However, instead of taping the plastic to the sides and bottom of the module, use the magnetic strips to hold it in place temporarily. You will still have to use some tape at the corners on the bottom and at the ITC end. Cover the girder opening at the ITC end. Cover the source holes with the magnetic patches. Some of the source holes at the ITC end will have to be covered with tape. Punch small holes in the plastic on each side to feed the laser input fibers through. Cover the ends of the laser fibers with the caps made from plastic tubing.
9.2 Install the test drawer
Remove the cover from the test drawer storage box and roll the box up to the girder at the non-ITC end of the module. Slide the drawer out about 10 inches and carefully adjust the level of the drawer at both ends using the jack screws until the drawer slides smoothly into the girder on the girder rings. Keep the part of the drawer external to the girder supported by the storage box until only about 10 inches remains outside. Pull the box out of the way and attach the stop plate to the end of the drawer with the machined surface toward the girder. Then push the drawer in until the stop contacts the girder ring.
9.3 Attach the cables
Roll the control rack up to a position beside the module. Feed the bundle of 5 cables, SCSI, 2 Canbus, HV and LV power, through the black light baffle bag. Connect the cables to the drawer. Note the two 15 pin D connectors for the CANBUS are colored red or green to match with their mating connectors. Make them secure with the screws in the connectors. Use the large socket head screws to attach the flange to the end of the girder. Wrap the Velcro ties around the bag.
9.4 Install the LED source and driver
Put the alignment fixture into the base, insert it into a source hole and turn on the magnetic clamps. Take the alignment fixture out of the base and put the source driver in its place. Attach the power cable and control cable.
9.5 Enclose the module with the light tent
The light tent should be used in case the module is not completely light tight. The control rack should be near the corner of the tent so that you can reach inside the tent to turn the HV on and off with the light out.
9.6 Start the scan software
There are two programs that are running during the scan. The Labview routine, QB-ANL, in the Q-bench folder controls the HV. The data is readout and the source is controlled by SCAN, in the release folder in the CSCAN folder. Start the HV routine, then the scan program following the instructions that are in the logbook and in the text file, scan.txt. Before scanning the module, do a light leak test to make sure everything is OK.
9.7 Scan the module
Use the fishing rod to pull the source through the module until you can grab it from the other end. The stepper motor should be relaxed, so you should start the software before pulling the source. The center of the source, where the LED is, should be outside of the other end of the module so that all tiles are scanned. Put the brass tube over the projecting part of the source for holes 1:6, and 11. On the other holes, that have a larger diameter, this tube interferes with the light to the first tile, so you have to use the black plastic tube instead.
Return to the driver end of the module and take up any slack in the cable over the spool. Push the source garage against the module to set the trigger. Make sure that the felt seal is all the way into the end of the garage. Do a 1-mm length jog from the scan program and check that the cable is feeding straight onto the spool. Use 3200 for the number of scan steps. The program will prompt for the module number, mm, the scan number, n, and the tile layer number, ll. These are used to make up the run number that is used in the data file name, runmmnll_scan.dat. Check that the first and last tiles have signals before going to the next layer.
9.8 The laser fiber scan
Use the special LED connected to the pulse generator to inject light into the laser fibers. The tile layer should be set to zero, which causes the scan program to read 100 points with out moving the source. The source driver limit switch must be open, otherwise the program will terminate the scan.
9.9 Run the analysis software
The analysis is software is in my directory on audi, /joey/usr1/miller/tiles/EBQC6/. The program that looks at the LED source scan is called 'ebscan'. It reads the data files that have been transferred from the ATLAS1 PC into a subdirectory of EQQC6 with the name of the module. The list of data files is supplied to ebscan using the file scan.lst. The program will find the peaks for each tile, compute the cell averages, list missing or low tiles, make histograms and a ntuple of the results. Another program, scanlsr, analyses the results of the laser data.
9.10 Repairs and rescan
We should attempt to fix any problems that shows up as a signal from a tile that is less than 75% of the cell average. A typical problem is caused by a fiber that is along side of a tile rather than against the end surface. Loose profiles are another common problem. These can be easily found and fixed by removing the profile, adding shims to the wide slots if necessary and reseating the profile. A low light level on both tiles sharing the same fiber may indicate a problem with the fiber. If these tiles are less than 70% of the cell averages, the fiber should be replaced. Large numbers of problems in the same fiber bundle usually means a problem in the gluing or polishing. These aspirin tubes usually have to be re-polished. The first tiles in layers 7:10 at the ITC end usually have low signals because of their larger diameter source holes. After fixing all of the problems that can be fixed, the module is re-scaned.
10.1 Tape the profiles
Strips of Aluminum tape are used to insure that the profiles don't come loose from the slots during shipping or installation in the TileCal barrel. Table 3 lists the location of the 12 strips of tape relative to the top of the module. Use the magnetic ruler that has been marked with these intervals. The tape has an aggressive acrylic adhesive, so it should be applied using the following technique to avoid wrinkles.
The ends of the tape should wrap around the end plates by about 1 cm. Peel the backing from the first 20-cm or so of the tape. Stick the end to the module at the desired height while holding the tape horizontal at arms length. Unroll the tape to the other end of the module and mark the length by folding the tape around the corner. Cut the tape at this end, peel the backing from a short section at this end and stick it lightly to the module at the proper height. Go back to the other end and pull the backing away from the tape while holding the tape horizontal against the module with the other hand. Smooth the tape as you go. When you get to the end of the tape you will have to unstick that end in order to get the backing out from under it. Use the rubber roller to roll the tape down so that it conforms to the irregularities on the surface of the module and profiles.
10.2 Cover the modules with the light tight plastic
This is a two-person job. Use sheets of the black polyethylene plastic to cover the sides of the module. Two lengths will be needed on each side. The plastic should be long enough that it wraps around the ends of the module by about 2 inches. Clean any dust off of the top of the module. Fold the edge of the first length of plastic over the top of the module and tape it temporarily with a few short pieces of the black polyethylene tape that has been obtained for this job. Pull out any wrinkles and tape the bottom corners to the end of the module. Then tape the entire top edge of the sheet to the top of the module. Overlap the next sheet with the first so that the bottom edge is just above the support beams. Tape it temporarily while you make any needed adjustments to get the sheet as wrinkle free as possible. Then tape along the entire overlap.
10.3 Cover the girder ends
Cut small pieces of the black plastic to cover the ends of the girder. Tape these around all edges but do not cover the module number or the survey target.
10.4 Install the plastic source tubes
Put the black tape over the source tube holes at the ITC end. Insert the 8-mm plastic straw tubes into the source holes and cut them to length so that they are about 1/8 inch below the surface of the non-ITC end plate.
10.5 Cover the source holes
Put a length of tape over the source tube holes on the non-ITC end plate.
10.6 Tape the ITC support panels
Cut some small pieces of the black plastic to cover the ITC optical cables and connectors. Tape these to the support panels. Cut out another piece of plastic to cover the ITC end tiles. Use the template to cut this shape and punch the holes for the source tubes. Tape the top and bottom edges of this to the ITC end plate. Tape the joints where the support panels meet this plastic sheet and where the support panels meet the ITC end plate. Wrap the sheets that cover the sides of the module over the ends and tape those edges. You will have to do some trimming at the ITC end. Tape the bottom of the side covers to the bottom of the girder.
10.7 Install the shipping cover
The module is covered during shipping with 1/2-inch thick Styrofoam tongue and groove panels on the sides and ITC end. The length of the side panels are cut to be about 3 inches shorter than the distance from the top to bottom of the module to leave clearance for the lifting fixture that is used to handle the module at ANL. Three panels are taped together over the joint using duct tape. The combined width of the three panels is equal to the length at the bottom of the module. The panels are not stepped to match the ITC end, instead an end piece is made using two layers of Styrofoam laminated to make a lap joint and support the side panels at this end. After taping the covers to the module, the module is wrapped with plastic stretch wrap.
11.1 Repairing loose spring pins
During the construction of the submodules, the steel plates are stacked and glued in a jig that holds the edges of the master plates aligned. The spacer plates are aligned to the master plates by inserting hollow spring pins into the source tube holes. One pair of pins aligns one spacer plate to the two master plates on either side of it. Occasionally, one of these spring pins comes loose and slides into the neighboring space that is supposed to be left open for the tile.
If the tile stops when it is half way in, this is probably the reason. Look to see if the spring pin is in the tile slot. If it is partly into the slot, you should be able to push it back into place using the following procedure developed by Dean Shooltz .
11.2 Replacing a profile
Profiles can be removed from the slots, but this must be done carefully to avoid damaging the profile or the fibers. It is usually easiest to start at the bottom end. With one finger on each side of the profile, lift it gently until that end comes out of the groove. Then, with your fingernails under the sides of the profile or with the special plastic tool under the fiber, slide up to unzip the profile. Check the profile and fiber for damage. If it is not damaged, it can be reused. Otherwise label it to describe the damage and what profile type it is (A-B cell). Put it in the special box containing damaged profiles.
11.3 Replacing a WLS fiber
a) Before it is glued into the aspirin tube.
Before it is glued into the aspirin tube, replacing the fiber is relatively easy. If it is still attached to the profile, the fiber to be replaced can usually be detached by sliding a thin stiff wedge, such as a piece of the plastic shim, between the fiber and the profile. If the fiber is being replaced because it is damaged, throw it in the trashcan. If the profile is damaged during the fiber removal, it should be replaced.
Select the new fiber, making sure that you have one that shows no cladding damage or other light leaks and has been cut to the correct length. Check that the mirror on the end is good. The mirrored end will be glued to the profile using the Loctite 425 cyano-acrlyate adhesive. Use a small amount of this glue, about the size of a pinhead, applied to the profile at a position corresponding to about 3-mm below the end of the fiber. If you get too much glue on the profile, remove the excess with one of the small stirring sticks before attaching the fiber. This is important, because too much glue will take too long to cure and may damage the fiber. Blow on the fiber end to add a little moisture that will speed the cure, then quickly place it in position and hold it in place with a piece of the Kapton tape.
b) After it has been glued into the aspirin tube
After the fiber has been glued into the aspirin tube, it is harder to replace. First, detach the end from the profile and glue on the replacement fiber as described above. Even more care should be taken to avoid damage to the profile, but if that does happen, consult with Mike or myself to decide whether to replace the profile and all three fibers or whether to continue with the repair.
After the new fiber has been attached to the profile, route the fiber with the others to the proper aspirin tube. The aspirin tube will have to be removed from the girder ring and set up in the special holding plate that has been made. Use the aspirin tube puller if it is tight. Pull one of the Teflon rods out of the glue and, using a piece of scrap fiber, make sure that the resulting hole is clear all the way through. Cover the polished end of the aspirin tube with a piece of the Kapton tape. Poke a hole in the tape so that the fiber can penetrate it. Make up a small batch of the Bicron 600 epoxy and squirt it into the hole in the aspirin tube. Then insert the new fiber and secure it so that it remains stationary while the epoxy cures.
After the glue has cured, shave off the excess fiber and glue from the bottom of the aspirin tube. Remove the tape and cut off the old fiber close to the aspirin tube. Replace the aspirin tube, without the plastic washer and re-polish the new fiber end.
11.4 Replacing Aspirin Tubes
After the aspirin tube has been glued it is still possible to replace and repolish it if necessary. Remove the screws and pull out the aspirin tube. Use the special puller if it is too tight to remove by hand. Make a slot lengthwise, about 2 mm deep in the surface of the aspirin tube with an Exacto saw or Dremmel tool. Attach the nutcracker that has been obtained for this job, fitting the chisel end into the slot. Tighten the nutcracker slowly until the aspirin tube breaks free.
If the aspirin tube is being replaced to repair a fiber bundle that had not been inserted far enough, you will have to drill out the new aspirin tube so that the bundle can be inserted deeper into the new one. This is done on the lathe, using the special drill bit for this purpose. Insert the new aspirin tube into the girder ring. Saw off the bottom of the glued fiber bundle and glue it into the new aspirin tube. After the glue has cured, polish the aspirin tube.
11.5 Repolishing fibers
In all of the repolishing operations, the polishing machine is set up as usual, but care must be taken not to damage the fiber ends that are not being repolished. This requires that aspirin tubes neighboring the one being repolished be pulled back in the girder rings to clear the diamond bit. Set the orientation of the bit at the top or bottom of the arc so that it clears the other polished surfaces as you drive the polishing tool into the girder with the polishing head turned off. When you have positioned the tool within about 5-cm of the aspirin tube that is to be polished, turn on the polishing head. Monitor its travel carefully and turn off the polishing head as it clears the newly polished aspirin tube. Orient the bit again and withdraw the tool.
a) Thin cuts
If the repolishing is to repair a superficial problem, this can be done by removing the thin plastic washer under the flange of the aspirin tube and tightening the screws to pull the aspirin tube in that extra amount.
b) Thick cuts
If a thicker cut is needed, the surface of the girder ring can be milled down, up to about 1 cm. After removing the aspirin tube, drill the 3 screw holes deeper. Then use the specially prepared end mill in a hand drill to lower the girder ring surface by the desired amount. Replace the aspirin tube and repolish it.
12.1 Safety Rules
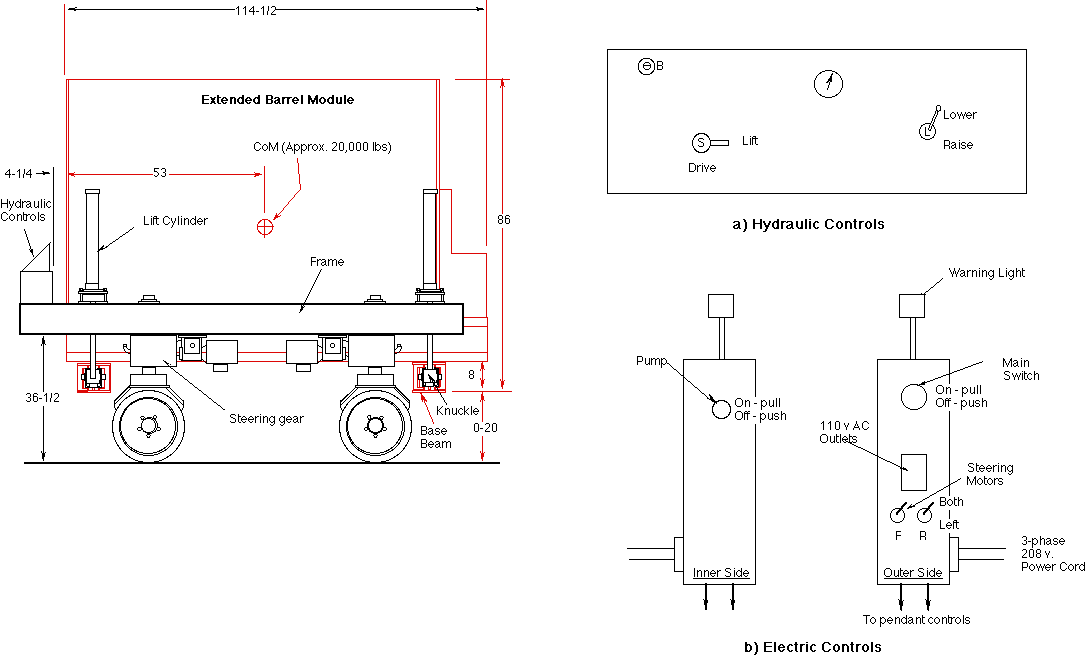
The module transporter is shown in Fig. 5. It should be treated as a potentially dangerous machine that could cause serious damage to persons or equipment if it is not used carefully. It takes a minimum crew of two and preferably three or four persons to operate. One person must steer each end and both must agree on the direction and duration of the motion. A third person is needed to handle the power cord and watch for other hazards. While the module is being moved onto or off of the truck, a fourth crew person is needed to operate the dock lift and be ready to assist with the wheel chocks and the ramps between the dock lift and truck.
Any person driving the transporter must be working under the supervision of Mike Nila, Ron Richards, or myself. Each of the drivers is responsible for clearance at their end of the machine. Take special care when moving the transporter onto and off of the module for inside clearance of the hydraulic hoses, steering motors and control cables. Pairs of wheels should always be parallel and turn together. If a pair becomes non-parallel, stop and realign them using the steering bypass switch described below. The wheels require extra clearance when they are turning. Make only minimal steering corrections when going through the doorways. Pressure in the hydraulic hub motors is the only braking system. If the transporter is on a slope, chocks should be put under at least two wheels before switching into lift mode or turning off the pump.
The person operating the lift controls has the responsibility for checking that all persons and equipment are clear and give a verbal warning before starting the lift or lowering operations. The lift operator is also responsible for the secure attachment of the module to the lifting rods. The module should not be left in the raised positions, supported only by the lifts any longer than necessary because leakage in the cylinders could cause the corners to settle unevenly. Except when it is being moved, the module should be sitting on the floor or on the jack stands.
12.2 Controls
a) Hydraulic Controls
The hydraulic controls are located on the panel at the rear of the transporter. The main elements are shown in Figure 6 a. Valve S, switches between lift and drive modes. The lift control, L, controls the direction and rate of motion of the lifting cylinders. Note that the direction of the control lever is opposite to the direction of motion of the module; move the lever up to lower the module and down to lift it. The further the lever is from the neutral position, the faster the lift or drop rate.
The drive speed can be changed by adjusting the pump bypass valve, B. This valve has been set to give the minimum speed and should not be changed except as directed by Ron or myself. The pump pressure is indicated on the gauge.
b) Electric controls
The external features of the electrical control box are shown in Figure 6 b. Detailed diagrams of the circuits are kept in a holder on the inside of the control box. The main switch turns on power to all elements and controls. However, as long as the power cord is plugged into the box and switched on at the wall, there is live high voltage inside of the box. The control box should never be open while the power cord is plugged in. The warning light, L is lit whenever the main switch is on. There is a separate switch that turns on the hydraulic pump motor. This is normally left in the on position since neither the lift or drive systems will operate without it.
The drive and steering control switches are in the two pairs of pendant control units attached via the coil cords at either end of the transporter. The heavier pendant controls the forward and reverse drive motors. Both front and rear controls must be in the same condition to activate the drive motors. The arrows on the sides of the frame indicate the direction of motion, white towards the open end of the transporter, black toward the closed end. Either operator can stop the motion by letting go of the switch.
The other pendant controls the steering motors on one pair of wheels. Both wheels of a pair normally turn together. The arrows on the ends of the transporter show the direction that your end of the transporter will turn if the transporter is moving toward you. Alternatively, the arrow gives you the direction that the tread on your side of the wheels will move. Assuming you are facing the transporter, white moves it to the right, black to the left. If the wheels in a pair become non-parallel, a single motor can be selected to align them using the wheel bypass switches, F (front) or R (rear). Switches attached to the top of the vertical steering shaft limit the steering range. One pair of limit switches is intended to be used eventually to make the wheels self aligning.
12.3 Module Attachment
The transporter is designed to lift and move the module in one orientation only. The open end of the transporter must correspond to the ITC end of the module. The transporter is maneuvered to straddle the module in this orientation with the flat end plate of the module in contact with the bumper at the inside rear of the transporter. The transporter should be aligned with the module so that the lift rods are symmetrically positioned within 4-cmwith respect to the ends of the beams under the module.
With the transporter in position, the lifting bars are inserted into the ends of the beams with the open side of the 'C' toward the inside web of the beam. The cut-away ends of the bars straddle the knuckle at the end of the lift rods. Line up the holes in the bars with the holes in the beam and insert the tubes. Lock the tubes in place with the screw pin finger tight. Then, fit the holes at the other end of the bars over the cylindrical ends of the knuckles and secure them with the large washers and bolts. These bolts are also finger-tight since they are not bearing any load.
12.4 Lift Operation
With the transporter in position straddling the module and the lift-drive valve in the lift position, the lift rods are raised or lowered until the knuckles are at the same height as the center of the beams within about 4cm. The four knuckles should be at the same height from the floor. The hydraulic lift system includes a flow equalizer to balance the load on the four cylinders. At the extremes of the motion, the lift or drop should be done at the minimum rate to allow the flow control bypass to equalize the position of the four cylinder rods. You will hear a squeal when this is happening.
Attach the module as described above. Check that all of the lift bar connections are right and all persons and equipment are clear. Lift slowly, making sure that all cylinders are lifting and the module is level. A height of about 15- cm from the floor is sufficient for clearing the transition between the dock lift and the truck and all other floor irregularities. If you are removing the module from the jack stands, bring it down to this height before transporting.
When the module is set onto the jack stands or onto the floor, make sure that it is sitting on a level plane. All four jack stands should be at the same height, on the beam centerline and equidistant from the ends of the beams. The base of the jack stands should be just even with the end of the beam. Lower until all of the lifting bars have no load, then detach the lifting fixtures using the reverse of the attachment operations. Put the lift bars and tubes back on the shelf.
12.5 Driving Operations
Before starting any move, check that the transporter is either completely detached or completely attached with the module lifted from the floor. The pump must be on and the hydraulic switch must be in the drive position. There must be one driver at each end plus a third crew to handle the power cord and watch for obstacles. Plan the maneuver and clear your path before you start the move. Communication between all of the crew is essential and you should talk loudly to make sure you are heard above the noise of the pump.
The drive wheels have no differential gearing system, so some of the tires scrub during turns and there is a loss of driving power. This is most noticeable when the transporter is carrying the module. It is best to make the turns as gradual as possible even if this means more back and forth motion. If there is room, it is better to do a translation with all four wheels pointing in the same direction rather than a pivot with front and rear wheels pointed in opposite directions.
There is very little clearance through the doorway to the loading dock. If the wheels are not pointing straight forward they will not clear the doorframe. Line up the transporter with the doorway as well as you can before going through. Realign the pairs of wheels by switching off one wheel of the pair if necessary.
12.6 Loading and Unloading from the Truck
Making the turn on the loading dock is easiest if you come straight through the door until the rear of the transporter can clear it. Then do a translation away from the back wall to gain some maneuvering space. A series of pivots to the rear and translations to the front completes the turn. To go into the doorway, reverse this procedure with translations to the rear and pivots forward.
Make sure that the transporter is centered on the dock lift. The truck should be centered on the lift with only a 1 to 3 inch space between. Put a chock in front of the rear wheels of the truck. When going between the lift and the truck, use the ramp plates to extend the width of the lift bridge plate. Make sure these are positioned mostly on the truck with only 3-4 inches on the lift. Adjust the lift height so that they lay in the same plane as the bridge plate. Make sure that the wheels and the covers over the hub motors will clear the sides of the ramps. As the module crosses the ramps, one crew person will have to adjust the height of the dock lift to compensate for the settling of the truck on its springs.
Driving the loaded transporter on the truck bed has been one of the most troublesome parts of this operation because of the slope and the soft spots and irregular surface of the bed. Use the ramp plates or the longer Aluminum plates to cover the bad places. Stay in the middle of the truck. Two crew persons should be ready to move the ramp plates and put the chocks under the transporter wheels.
The driver will tell us where he wants the module to be set down. Attach the extension beams and put the cover on the top of the module. Help the driver to secure the load, pad the corners and cover the module with the tarps.
Table 1: PMTs, Cells, Aspirin Tubes, Silicone Tubes
|
PMT # |
CELL |
Aspirin Tube ID (mm) |
Fibers per Sub-bundle L, R |
Silicone Tube ID (.001 in) L, R |
|
1 |
E3-Clear |
5.5 |
8 |
188 |
|
2 |
E4-Clear |
5.5 |
8 |
188 |
|
3, 4 |
D4 |
7.5 |
17,17 |
188 |
|
5, 6 |
C10 |
5.5 |
11 |
188 |
|
7, 8 |
A12 |
5.5 |
9 |
188 |
|
9 |
B11 |
7.5 |
16, 16 |
188 |
|
10 |
B11 |
7.5 |
9, 23 |
188, 250 |
|
11, 12 |
A13 |
10.3 |
25, 25 |
250 |
|
13 |
E1-Clear |
5.5 |
8 |
188 |
|
14 |
E2-Clear |
5.5 |
8 |
188 |
|
15, 16 |
B12 |
10.3 |
27, 27 |
250 |
|
17, 18 |
D5 |
14.5 |
65, 65 |
438 |
|
21, 22 |
A14 |
10.3 |
28, 28 |
250 |
|
23, 24 |
B13 |
10.3 |
30, 30 |
281 |
|
29, 30 |
A15 |
10.3 |
30, 30 |
281 |
|
33, 34 |
B14 |
10.3 |
32, 32 |
281 |
|
37, 38 |
D6 |
14.5 |
75, 75 |
438 |
|
41, 42 |
A16 |
12.0 |
48, 48 |
313 |
|
43, 44 |
B15 |
10.3 |
35, 35 |
313 |
|
Box # |
Profile Type |
Cell |
Profiles / Module |
Profiles/ Box |
Fiber Lengths (cm) |
||
|
A |
B |
D |
|||||
|
68 |
Long |
A12B11 |
9 |
23 |
196 |
163 |
156 |
|
69 |
Short |
A12B11 |
9 |
23 |
187 |
176 |
171 |
|
70 |
Long |
A13B11 |
7 |
19 |
211 |
163 |
156 |
|
71 |
Short |
A13B11 |
7 |
19 |
202 |
176 |
171 |
|
72 |
Long |
A13B12 |
18 |
119 |
211 |
163 |
156 |
|
A14B12 |
9 |
||||||
|
A14B13 |
19 |
||||||
|
A15B13 |
11 |
||||||
|
73 |
Short |
A13B12 |
18 |
119 |
202 |
181 |
171 |
|
A14B12 |
9 |
||||||
|
A14B13 |
19 |
||||||
|
A15B13 |
11 |
||||||
|
74 |
Long |
A15B14 |
19 |
43 |
211 |
173 |
156 |
|
75 |
Short |
A15B14 |
19 |
43 |
202 |
186 |
171 |
|
76 |
Long |
A16B14 |
13 |
31 |
231 |
173 |
156 |
|
77 |
Short |
A16B14 |
13 |
31 |
222 |
186 |
31 |
|
78 |
Long |
A16B15 |
35 |
75 |
231 |
178 |
156 |
|
79 |
Short |
A16B15 |
35 |
75 |
222 |
191 |
171 |
Table 3: Aluminum Tape Locations
|
Tape Number |
Distance from the Top Edge of Tape to the Top of the Module (cm) |
|
1 |
2 |
|
2 |
12 |
|
3 |
23 |
|
4 |
35 |
|
5 |
47 |
|
6 |
59 |
|
7 |
72 |
|
8 |
87 |
|
9 |
102 |
|
10 |
117 |
|
11 |
132 |
|
12 |
148 |
|
Even Side |
Odd Side |
|
PMT 10:12 |
PMT 11:13 |
|
PMT 20:22 |
PMT 19:21 |
|
PMT 28:30 |
PMT 27:29 |
|
PMT 38:40 |
PMT 37:39 |